Weeks of Wanderlust - Travel Blog
Home
Blog
About Me
Weeks of Wanderlust - Travel Blog
  • Home
  • Blog
  • About Me
Browsing Category
Travels
Travels•Trip Report

Tongariro Alpine Crossing Trip Report

Emerald Pools and Red Crater on the Tongariro Alpine Crossing
July 17, 2018 by Elsbeth No Comments

I woke up groggy. I had been on the road later than I anticipated the previous night. There were periods during the drive where the rain was pouring, which made for an exhausting drive. Despite my fatigue, I was anxious to get started with the Tongariro Alpine Crossing. It is the most popular day-hike in New Zealand, but it is also particularly dependant on good weather. Just my luck, the weather was supposed to be perfect.

We spent the night at Tongariro Adventures, an amazing bed and breakfast I found on Airbnb run by Barb and her husband. Besides being an awesome place to spend the night, they also provided an incredibly hearty breakfast and a car spotting service for the Tongariro Alpine Crossing. We were quite lucky since we found out that the previous guests were unfortunate and were unable to start the hike due to bad weather. The host’s hospitality continued all the way to the trailhead where she offered to take our picture.

Tongariro is probably best known for being the setting of Mount Doom in Lord of the Rings. The crossing is a day hike, but it is also part of the Tongariro Northern Circuit; one of New Zealand’s Great Walks. Unlike Routeburn or Kepler, however, it is the most prominent feature in a relatively flat part of the country.

The Crossing is a long day hike, so we said our farewells to Barb and hit the trail!

The sun hanging low over the start of the Tongariro Alpine Crossing

Kilometers 0-6 of the Tongariro Alpine Crossing

The first few kilometers are a very steady, slow incline. The scenery is very desolate since the trail winds through young volcanic deposits.  The early part of the trail is right next to a small river. It offers a little bit of variety next to the dark volcanic soil.

It was immediately obvious how busy the trail would be. There were so many people walking on the path, it was rather frustrating getting stuck behind people wearing skirts. But we were in no rush; just hoping to enjoy our last major outdoor activity in New Zealand.

The sky had been clear, but there was a bit of cloud hanging just on top of the Crossing. As we started walking, however, the clouds began to clear. All of a sudden we had a perfect view right on Mount Doom (also known as Ngauruhoe ). Standing in the midst of this iconic landmark made me feel like I was on some epic quest – with a thousand of my closest friends!

Early in the morning on the Tongariro Alpine Crossing

Kilometers 6-8 of the Tongariro Alpine Crossing

After winding through a valley for sometime, it was time to start climbing. It is said that the Tongariro Alpine Crossing is the toughest hike in New Zealand. I am not sure if that is true, but the initial climb is relentless.

In about 2 kilometers, you climb 500 meters. On top of being a lot of vertical gain over a short amount of time, there are also a ton of people on the trail, all travelling at their own pace. Eventually, we got to the top of the first part of the climb. There was still a hill to overcome, but suddenly there were sweeping views that stretched fat to the West.

Unlike the trails in the Southern Alps, which traverse through mountainous country, Tongariro is a stand-alone mountain. Looking over the edge of the trail, there were no mountains obstructing the view – it was clear to the coast.

Looking out into the distance from the Tongariro Alpine Crossing

The trail at this point continued through a flat section in between two volcanic cones. The earth was steaming. Watching the line of people pass through the mist, it felt like I was watching a pilgrimage of sorts.

As we were walking through the mist, we saw someone take out a drone and start flying it. Tongariro is a no drone zone. Maybe this makes us buzz kills, but we told them there were no drones allowed on the trail, and they put it away.

After passing through the steaming strip of earth, the trail makes one final climb. The earth was looser there than in previous parts of the trail, so it took a bit more attention to footing. After about 10 minutes we were at the top.

Passing through the steaming earth

Lunch Break

The views from the top were unreal. You could see Tongariro, Ruapeho, and Ngauruhoe. Beyond that, just rolling hills as far as the eye can see. We picked a seat on the edge of the trail overlooking a volcanic pit that was bright red.

We had packed sandwiches for the trip, so it was enjoyable just sitting up there taking in the view. I noticed a buzzing sound behind me. Another person was flying a drone. This time I went up to him and told him this was a no drone zone. He was a bit more combative than the first people, but he also put the drone away.

View of Ngauruhoe from the Tongariro Alpine Crossing

We finished up eating, and decided to continue our trek.

Kilometers 8-11 of the Tongariro Alpine Crossing

Upon leaving our lunch spot, the trail gets even looser very quickly. It felt like walking on sand. But, only a few meters from where we ate our lunch, we were treated to the greatest view of the entire walk.

This is really what people come to Tongariro to see, and I don’t blame them. The beauty is other-worldly and the colors are hues not frequently found in nature. Despite the beauty, it was very difficult to take a good photo here because of all the people.

Red crater on the Tongariro Alpine Crossing

We travelled down the side of the hill and decided to just sit by one of the pools for a bit. It was relaxing to just sit in such an amazing place and take in the bustle all around. The smell of sulfur was strong and huge patches of smoke were rising from beneath the ground. After fifteen minutes, we decided to continue our trip.

After passing by all of the pools, the trail makes one last climb up to a larger lake. It was quite a large lake. I was surprised to see some birds swimming in it. The path winds around the lake and then down the other side of the mountain. From the top, before making the pass to the other side, we took one last look at the beauty behind us, and began our descent.

The emerald pools on the Tongariro Alpine Crossing

Kilometers 11-14 of the Tongariro Alpine Crossing

The rest of the trail is all downhill. At the top, it starts out through a grassy section of the side of the mountain. The views are nice, but the trail gets very narrow in some sections and it is difficult to pass people.

This part of the trek was surprisingly pleasant. The weather was really nice, the scenery was really pretty and Dennis and I were in good spirits as we were chatting. At a certain point, we passed another group of people with a drone. I felt a little fatigued playing the bad-guy for a third time, so we didn’t say anything as we passed by.

Blue pool on the Tongariro Alpine Crossing

About a third of the way down the mountain, the trail passes by a hut that is no longer in commission. That’s because in 2012, the volcano erupted, spewing rocks down the side. One of those rocks plummeted right through the roof of the Ketatahi hut, into a bunk. Fortunately, no one was in the bunk at the time, but the DOC wouldn’t take the risk again and closed the hut permanently. It is really a shame since the hut is in a beautiful location. I hoped for a chance to see the hole the rock left in the bed as we passed by, but apparently the hut is completely closed off to the public.

There is still evidence of volcanic activity on the sides of the mountain, where large clouds of smoke were billowing.

Down the other side of the Tongariro Alpine Crossing

Kilometers 14-19.4 of the Tongariro Alpine Crossing

The rest of the hike is just a continuation down the side of the mountain. Eventually, after descending enough, the trail enters tree-cover. As you continue down, the forest gets thicker and the trail gets muddier. We passed signs that warned about lahar dangers, which could prove deadly if the circumstances appeared.

The trail down the Tongariro Alpine Crossing

About 7 hours after we started, we arrived in the parking lot. The trip was not over for us yet, though. Due to our relatively late start, we had to leave our car about a kilometer from the trailhead. We walked down the dusty road and eventually to the main road. Finally, we arrived back at our car.

We changed shoes, and began our drive to Rotorua.


Share:
Reading time: 7 min
Travels•Trip Report

The Kepler Track Trip Report

June 24, 2018 by Elsbeth 1 Comment

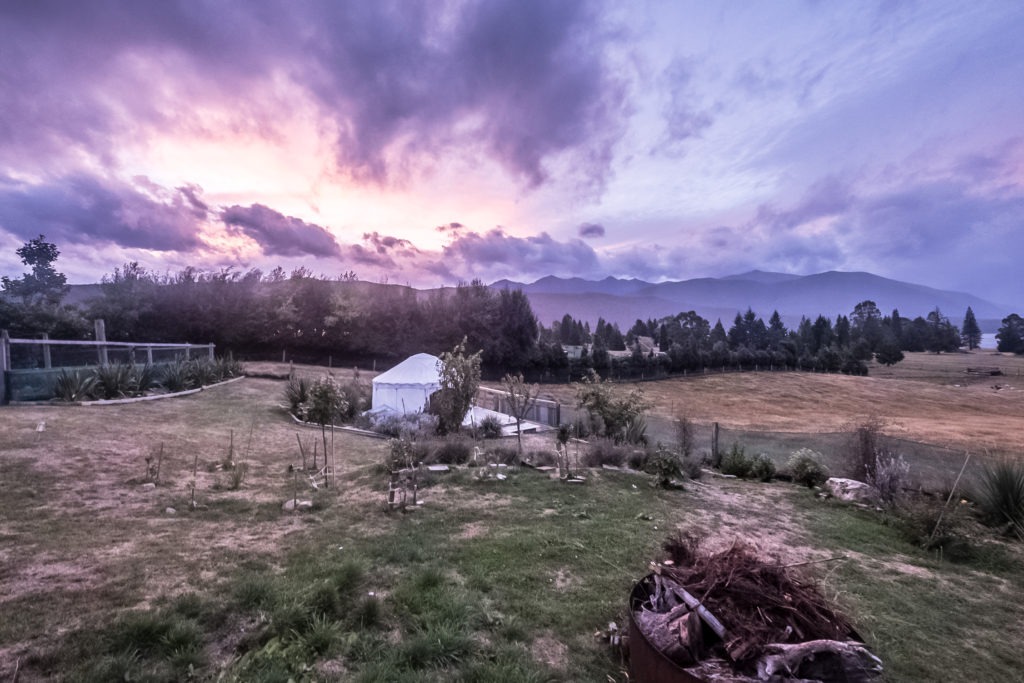
I woke up to the soft morning light coming through the walls of our yurt. It had been less than a day since I finished the Routeburn, but I was well-rested after a night in one of the best Airbnb’s I have ever stayed in. As with our previous Great Walk, we missed the cutoff to pick up our hut tickets for the Kepler Track the night before. We quickly packed up and left the yurt to head into the town of Te Anau.

The yurt I stayed in the night before starting the Kepler Track. This photo was taken at sunset.

We arrived at the DOC office before it opened. There were a few other people also waiting when we arrived. Talking to one of them, we learned that it was possibly to skip the first 10 kilometers of the trek by taking a boat across Lake Te Anau. They were planning on skipping the first hut since it was booked full and skipping the first section made their first day distance more reasonable.

After we had our tickets in hand, we decided to head into town for a last minute breakfast before hitting the trail. We stopped at Bailiez Cafe for breakfast. It was the perfect pre-hike breakfast, and it really hit the spot. My plate of sausage and eggs gave me plenty of energy for the day.

We drove to the trailhead, which was only around 10 minutes from central Te Anau. Since the Kepler Track is a loop, the whole walk is extremely accessible. I did not know this until about 10 minutes before I started, but apparently there is a second trailhead about 10 kilometers from the first, making it possible to cut the loop about two hours short. Since I had figured we would be walking the entire 60 kilometers, this did not phase me too much, but it would certainly come back to haunt me.

Day 1

Kepler Track Kilometers 0-5.6

The first ten kilometers of the Kepler Track travel through a forest of ferns.

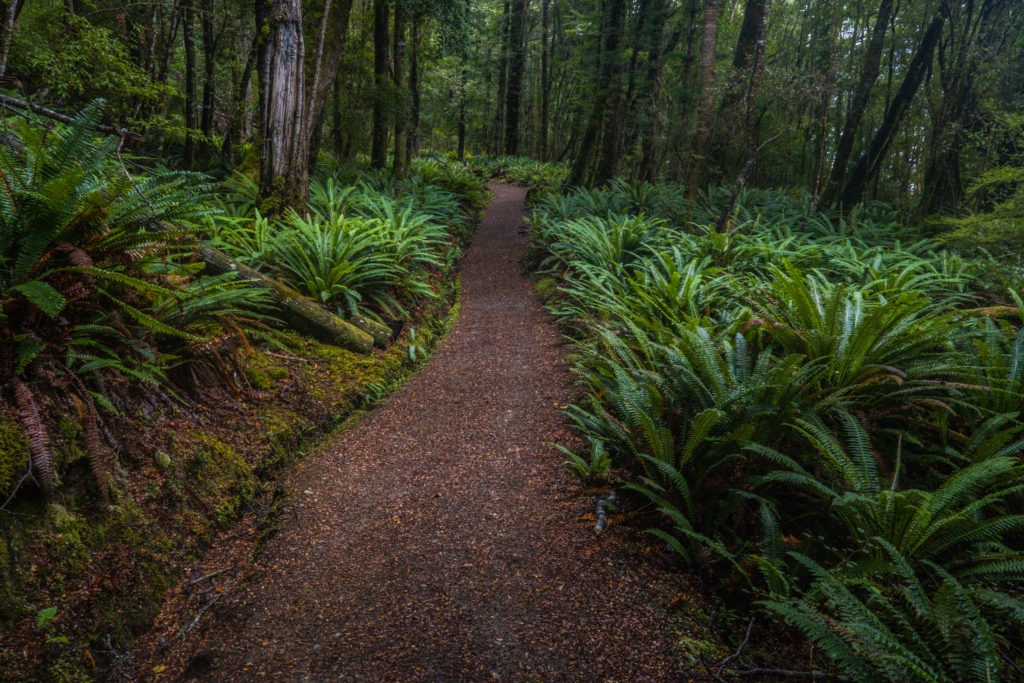
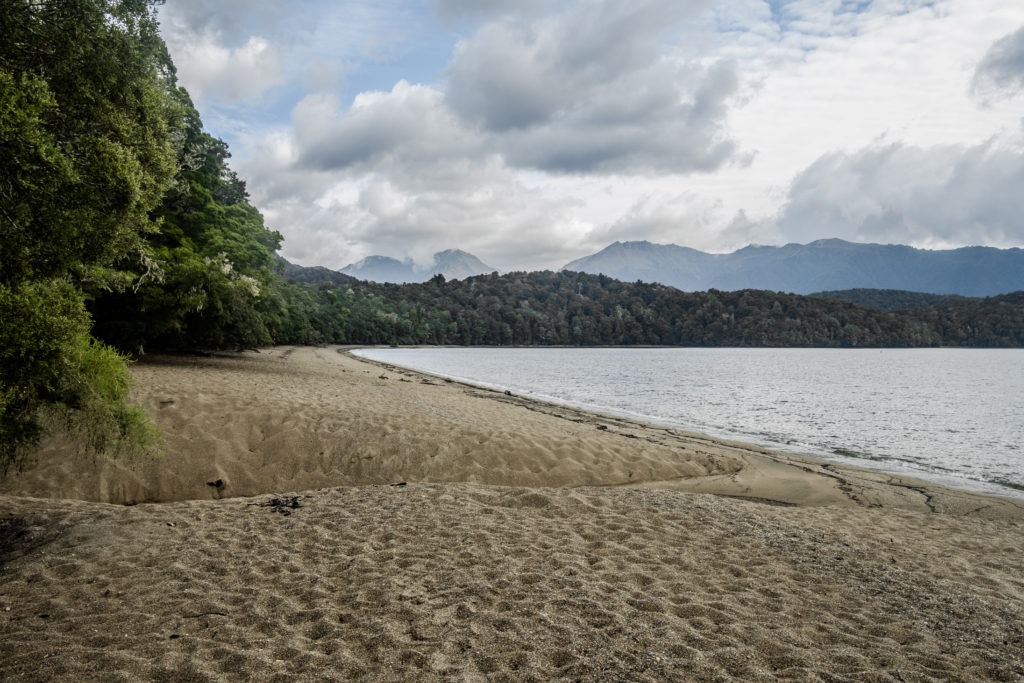
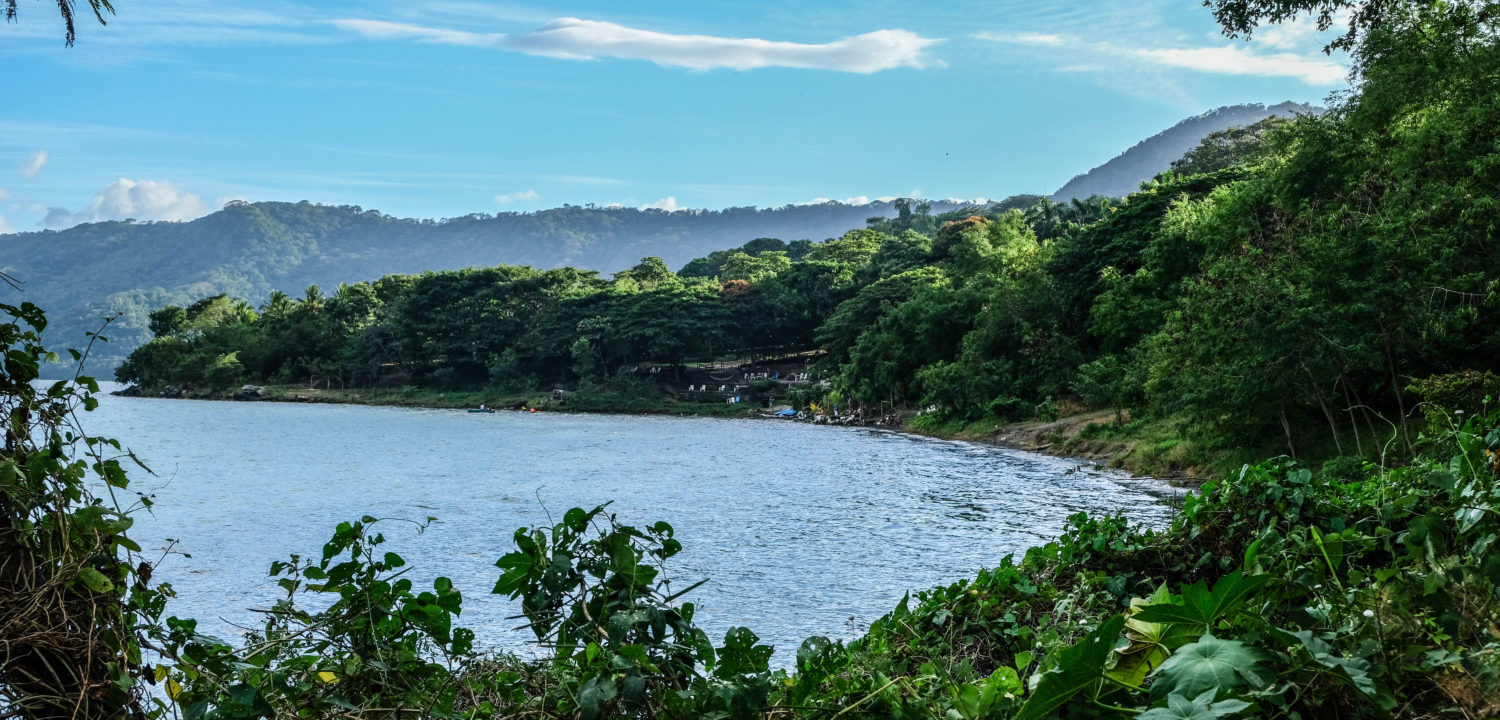
The first ten kilometers follow the shore of Lake Te Anau. It is a fast section of the trail since it is mostly flat. This was the section that the folks we met in the DOC office were skipping. There was nothing super notable about this section, other than the forest was super lush, and we were constantly surrounded by huge ferns.

This section of the trail was also full of day hikers. Especially after our previous few days on the Routeburn, this trail felt way more commercialized. If you are headed to New Zealand for solitude, you will not find it on the Kepler Track.

At the 10 Kilometer mark, the trail arrives at the first campsite. This is where the water taxi stops for those who opt to skip out the first section. It is also the last place to find a restroom before the ascent up the mountains begins, and it smells like it too. We stopped here only briefly to use the facilities before beginning the climb.

Te Anau Lake. You can take a boat shuttle from Te Anau to this location if you want to bypass the first 10 kilometers of the Kepler Track.

Kepler Track Kilometers 5.7-13.8

The next section of the trail is absolutely punishing. It is a series of unending switchbacks through the forest, up the mountain. Switchbacks are psychologically tough even in the best of  conditions, but on the Kepler track, you are surrounded by dense foliage, with the top always seemingly right above you. This section felt really long. I powered through, however, thanks to my hearty breakfast.

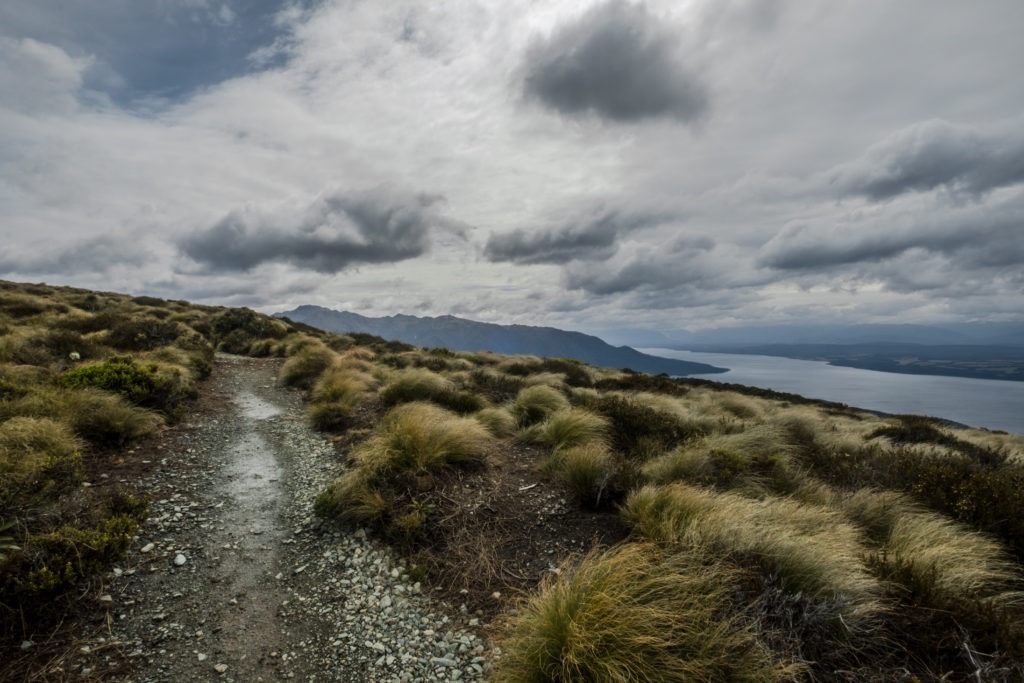
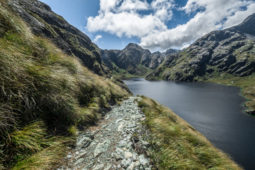
I stopped once, briefly, to take off my mid-layer and then stopped for a bit to let Dennis catch up. Once we were walking together again, we decided to stop for a quick snack. Only five minutes past our resting spot, we reached the top of the treeline and came upon a large field of tussocks.

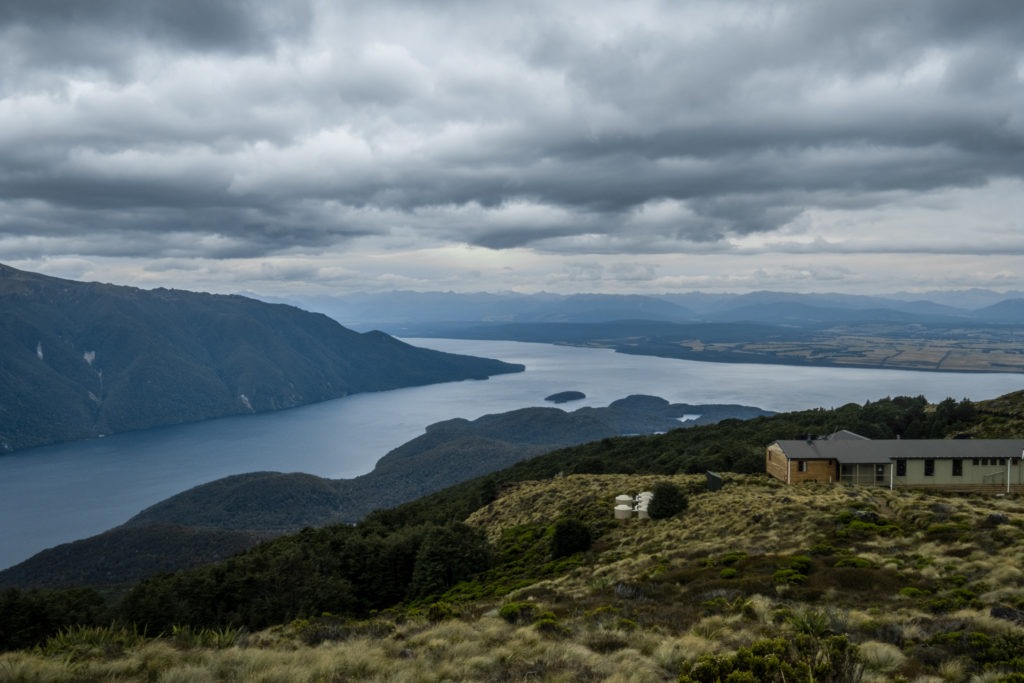
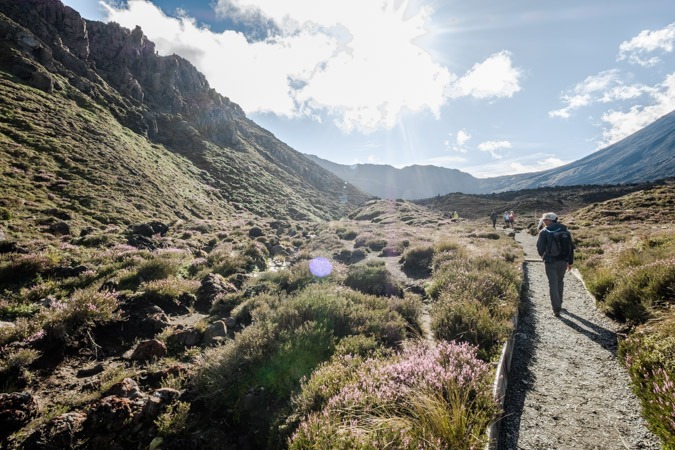
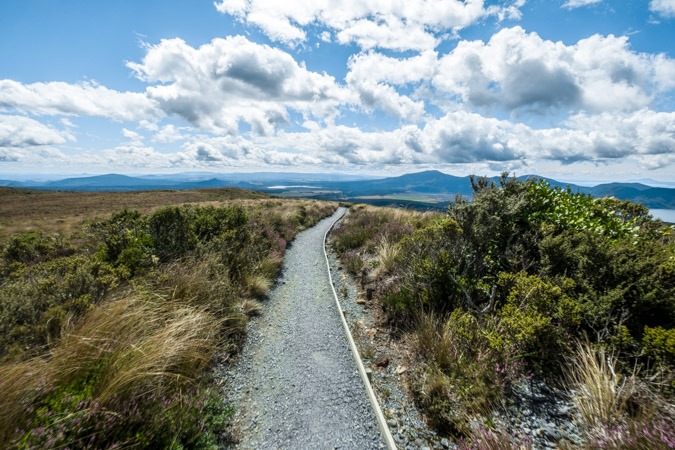
The final walk to the hut passes over some very fragile alpine meadows, so the DOC has built an elevated walkway. It is good for the ecology and also very aesthetic. After about twenty minutes, we had arrived at the hut. We were among the first to arrive for the day, so we had our pick of the bunks. After picking two good spots in one of the cabins, we went back to the mess room to make some lunch.

At the top of the switchbacks, you have beautiful views of Lake Te Anau

Side Trip To Mount Luxmore

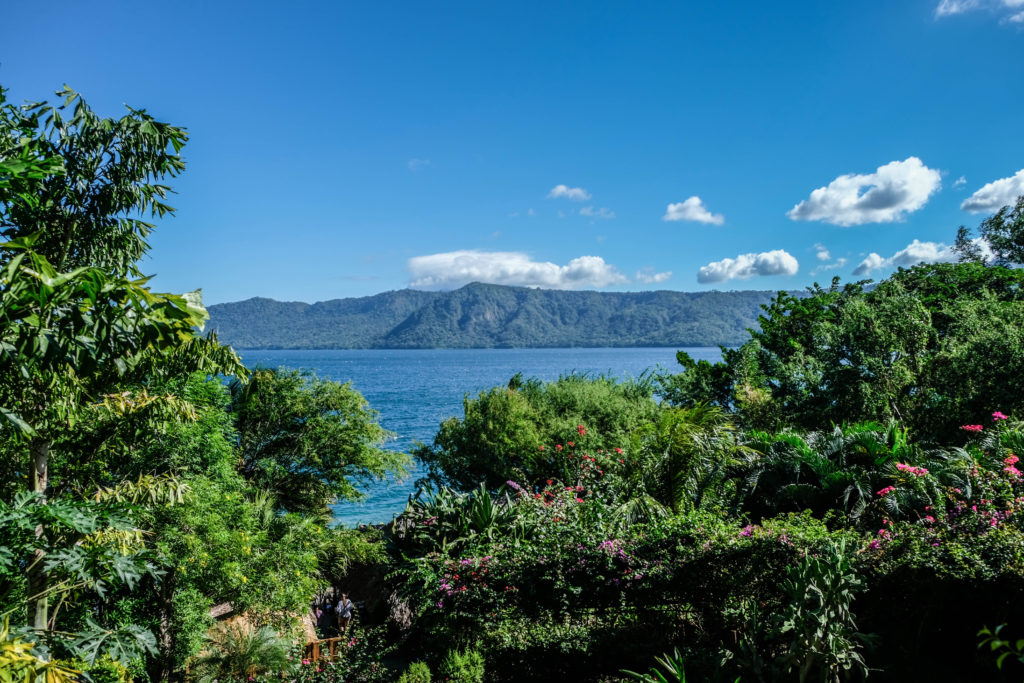
We arrived at the hut sufficiently early, so we decided it would be worthwhile to make a few of the side trips from the hut. The first is the trip to Mount Luxmore. From the Luxmore hut, it is a steady climb up to the top of the mountain. The entire way up, you have a pretty clear view of Lake Te Anau far below.

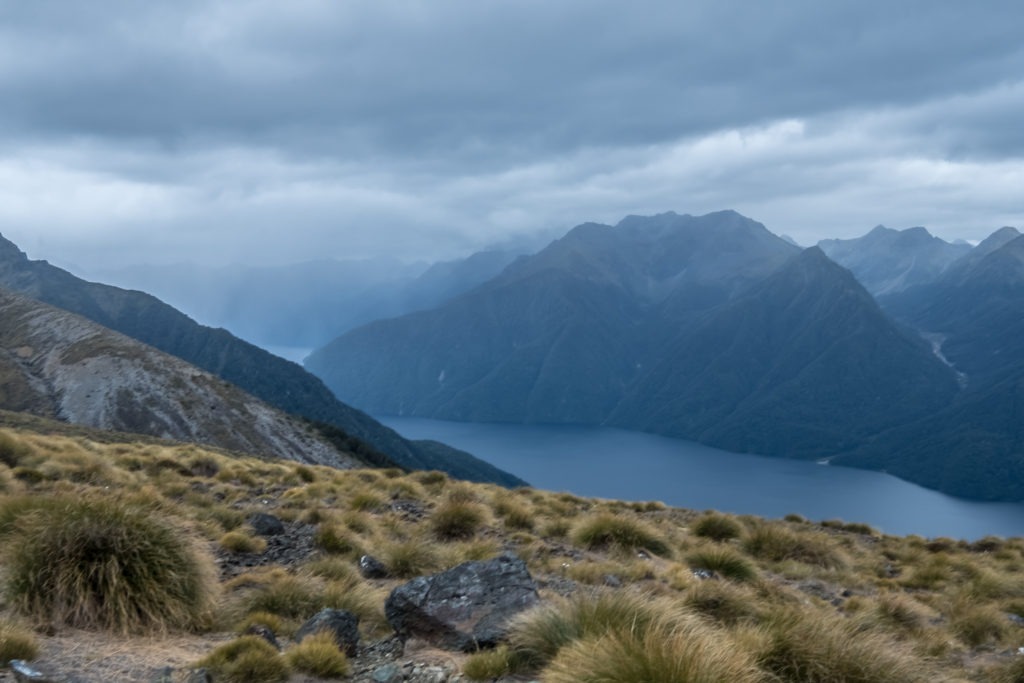
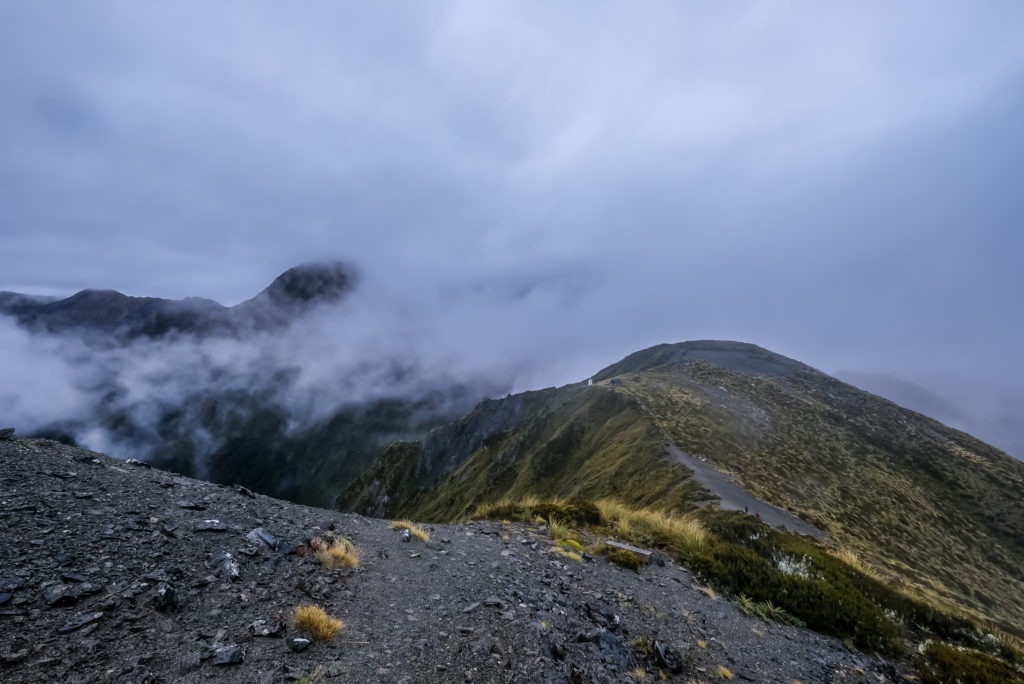
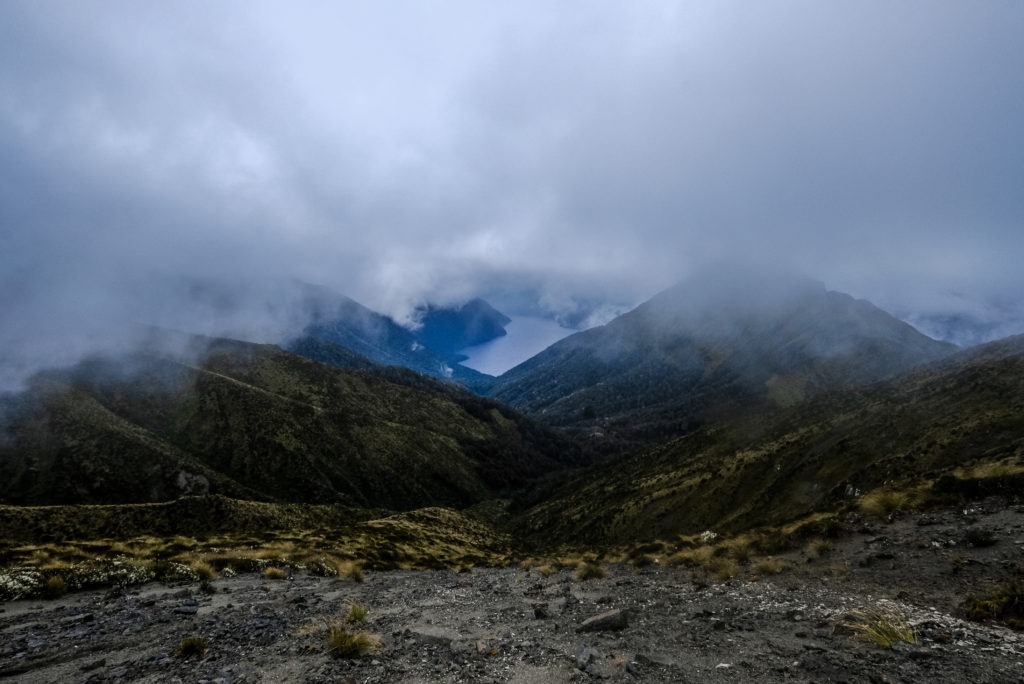
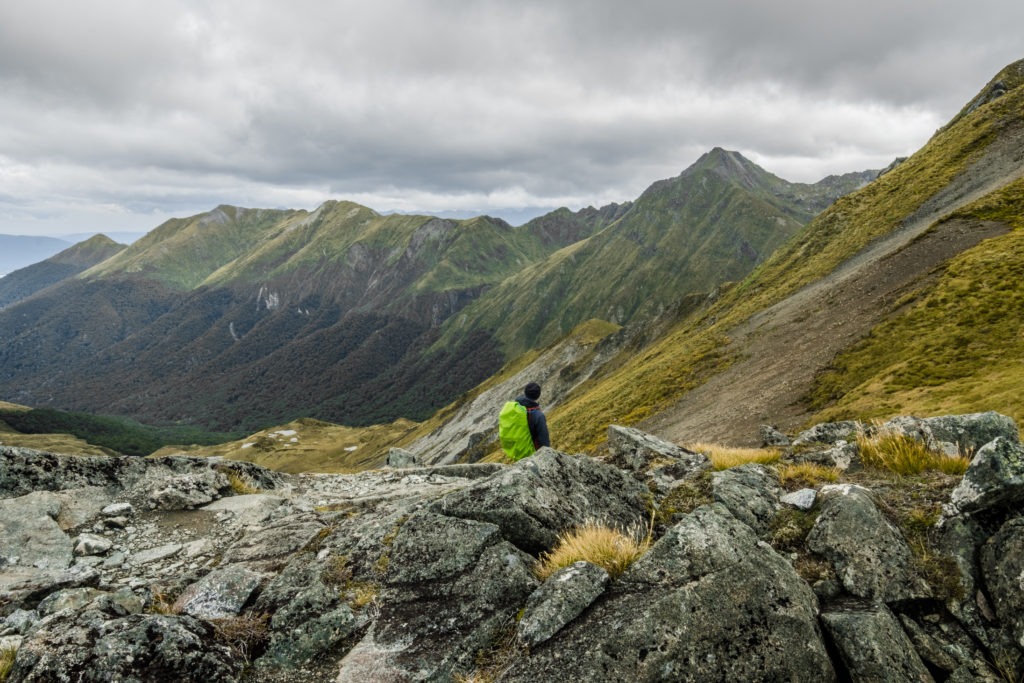
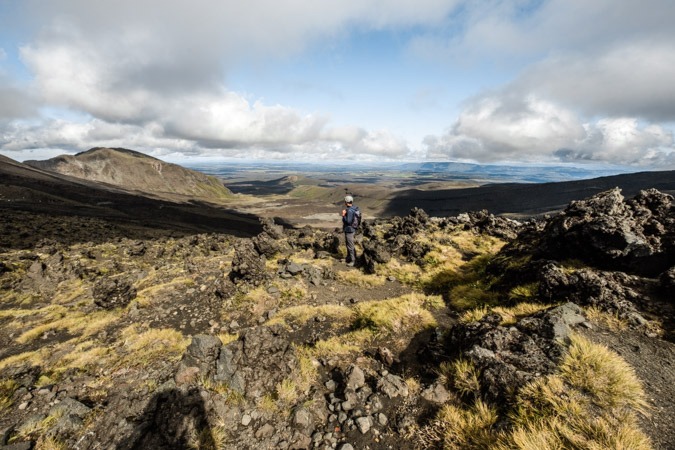
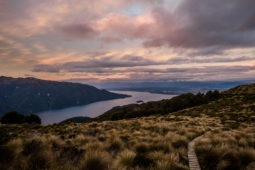
About 30 minutes past the hut, the trail rounds the mountain and suddenly you have views on the rest of the Kepler range. The clouds were low enough in the sky that I could see them resting on the mountains as they stretched out before me, but still high enough to offer impeccable views.

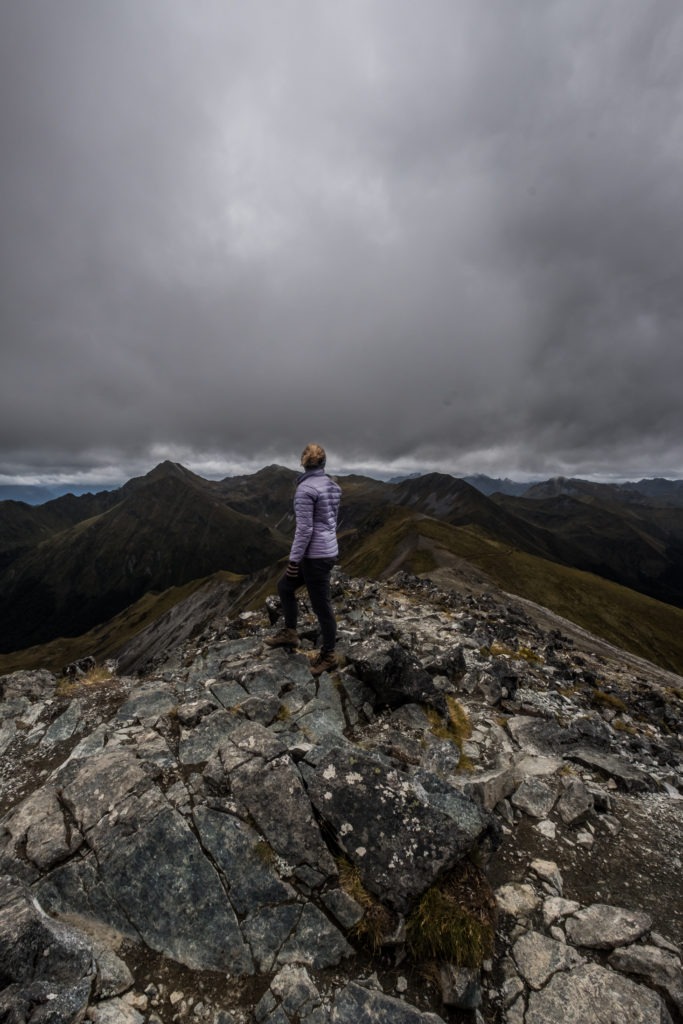
Finally, we reached the top of the mountain. We were the only ones at the top and there was this sense of being on top of the world. We could see the hut below us, the lake below us, and even the town of Te Anau far below us. For the first time all day, it felt peaceful and serene.

The view down to Lake Te Anau from the trail up to Mount Luxmore.

After a few moments, the wind began picking up and the clouds appeared to be encroaching, so we made our way back down.

Upon reaching the hut, we were pleased to find a pair of cheeky Kea sitting atop the structure. We spent a few moments enjoying the sight of these alpine parrots and attempting to take photos of them. All we had were iPhones and a Fujifilm with a super wide angle lens, so none of the photos turned out as well as we hoped.

Me standing on top of Mount Luxmore.

Side Trip to the Luxmore Caves

The other side trip from the Luxmore hut is the Luxmore Caves. Apparently these caves are created by glacial runoff carving through the sides of the mountains. We grabbed our headlamps and head back out for one last trip of the day.

This side trip was much closer to the hut than Mount Luxmore had been, so it only took about 10 minutes to reach the entry to the cave.  At the mouth, there were some instructions about sustainable caving. I had never gone into a cave before, so the information was quite new to me.

Inside the cave, the floor was much more slippery than I had expected.  Between that, the slope on the ground, and the instructions not to touch anything, I found the experience more overwhelming than I anticipated. When my headlamp began flickering out, I decided that I had had my fill of the cave and that maybe this activity is not for me.

We made our way back to the hut to begin preparations for dinner.

Views back on the Luxmore Hut from higher up on the Kepler Track.

Evening at Luxmore Hut

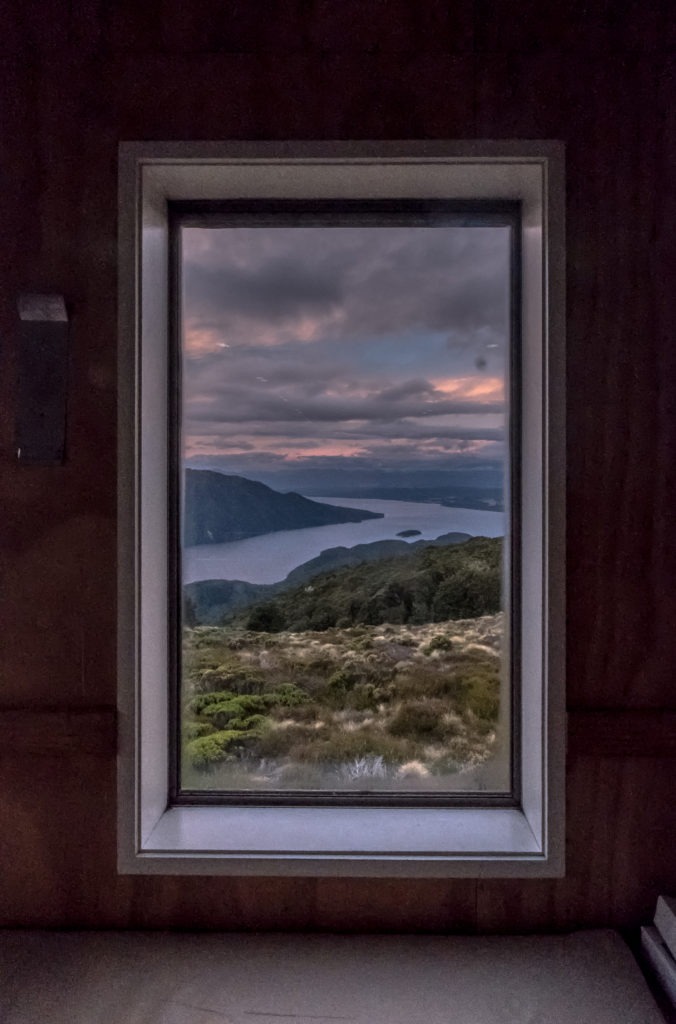
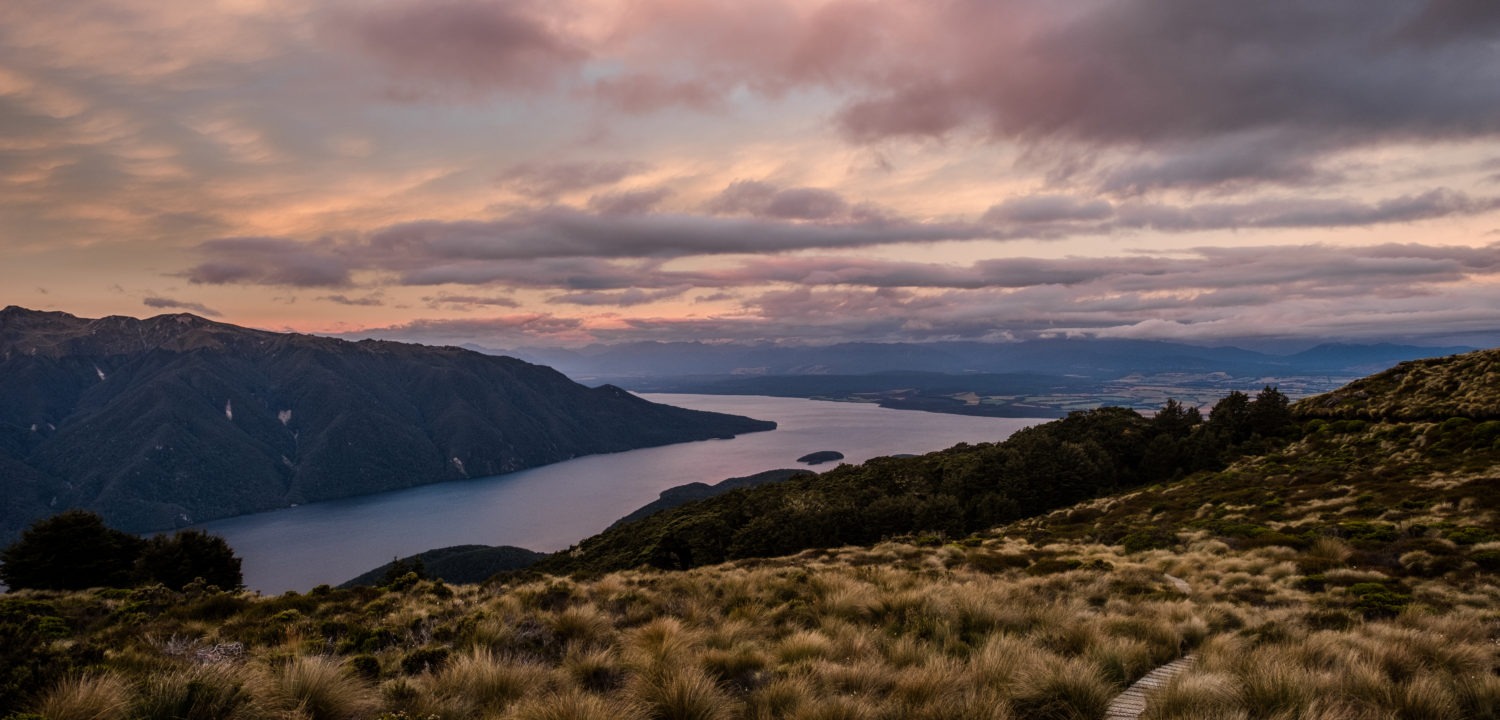
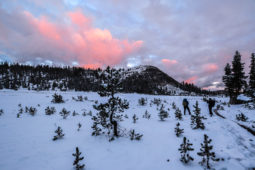
When we arrived to make dinner, we found the mess hall was full of people. It was actually difficult to find a place to eat! But, we enjoyed our rehydrated food nonetheless. One of the more interesting things about the Luxmore hut is that you can see Te Anau very clearly from inside. It is surreal to be surrounded by the Alpine meadows in every direction, and then still see the lights far below. From the hut you could see the pink glow of the sunset touching the clouds as far as the eyes could see.

After dinner, the hut ranger made his evening announcements. The most important announcement was that a cyclone was due to hit the South Island the next day. This would cause the wind to be stronger than usual which could make the alpine crossing potentially dangerous. He finished with advice to get an early start, as the wind wouldn’t pick up until later in the day. With that, we cleaned up our cookset and head to bed.

The view from inside the Luxmore Hut at sunset.

Day 2

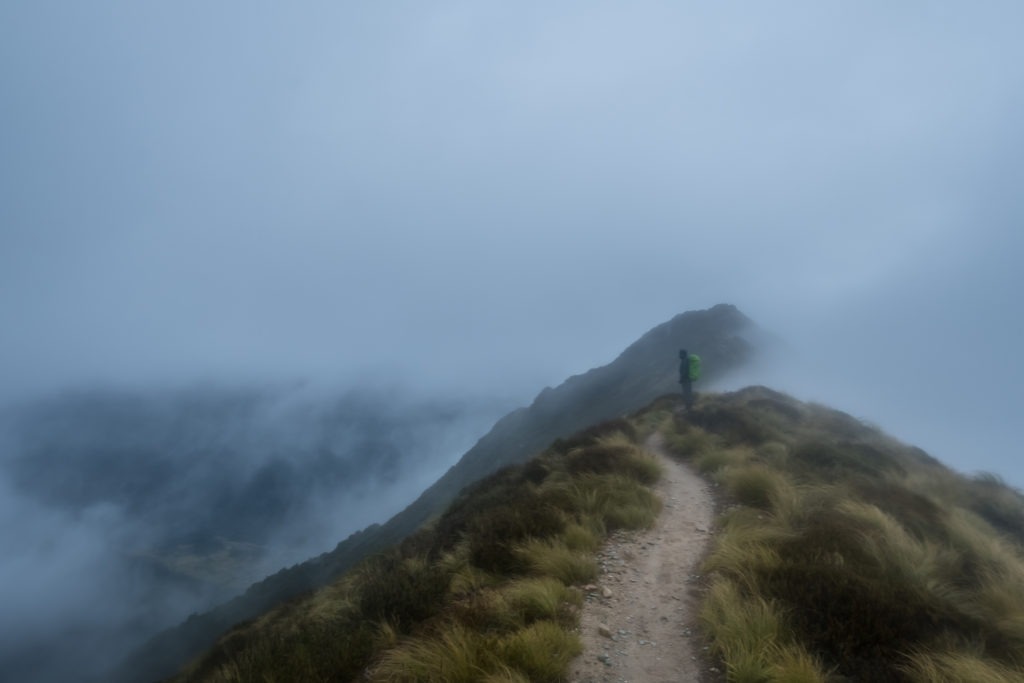
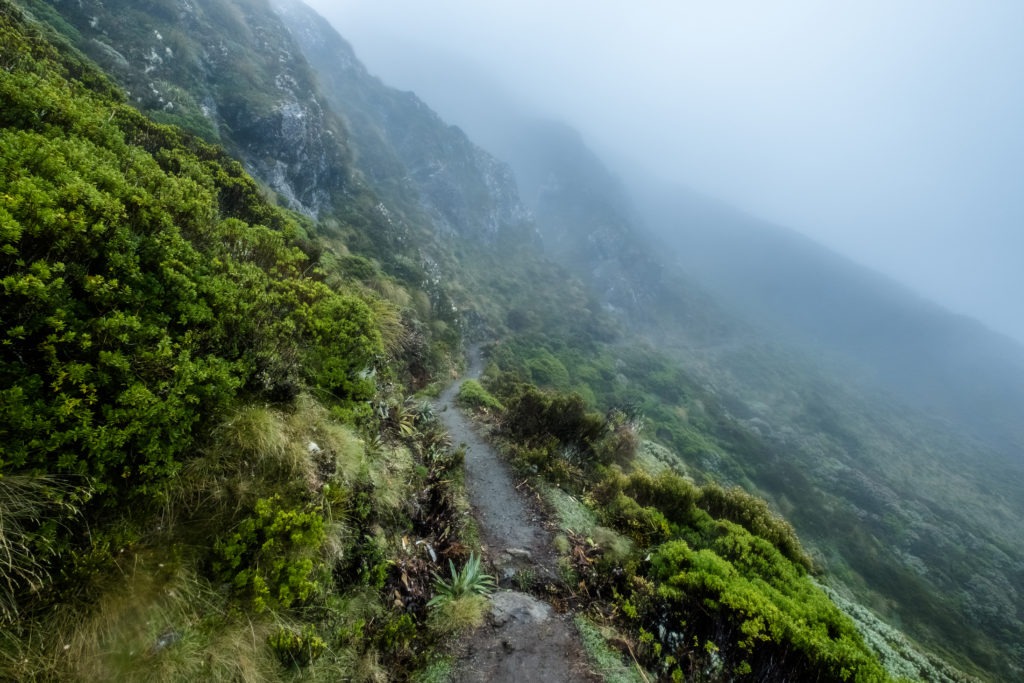
We woke to significantly worse weather than the day before. The fog was so dense, I could barely see 10 feet ahead of me. We hoped that the clouds would lift a bit during our crossing, but we were not holding our breath.

Kepler Track Kilometers 13.9 – 23.3

We head out and up the same path that we had taken the day before to get to Mount Luxmore. In stark contrast to our previous trip, the summit never once came into sight during our trek around the mountain. We took a brief pause at the fork that took trekkers up the mountain and counted ourselves lucky for making the trip up a day earlier.

We pressed onwards. This was the highest point on the entire trek, and the slight drizzle was closer in consistency to sleet. We were essentially walking through a light, wet snow.

The Kepler Track in the fog.

After about 45 minutes of hiking, we came to the first emergency shelter. It was one of those places that you could tell would be absolutely stunning in good weather. Instead, we were just shrouded in a white blanket.

Not too far after this emergency shelter was a second shelter. This one came just before the last ascent of the trip. It was at about this point in time that we started running into people headed the opposite way. There weren’t many, certainly fewer than we had shared our hut with the previous night, but there were some.

Views of Lake Manapouri from the Kepler Track.

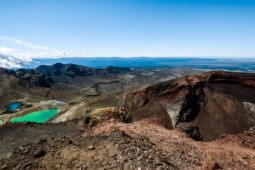
We reached the last high point on the Kepler Track and all of a sudden we were faced with a stairway down into the abyss of clouds. Despite everything, there was something really stunning and dramatic about this staircase that essentially dropped into the fog. Unfortunately, the weather never quite cleared as we had hoped, and at this point we were now headed back below the timberline.

Kepler Track Kilometers 23.4 – 28.4

Once we were back in the tree cover, we began a long conversation about what the next moves should be. We had very unfortunate weather for what was suppoed to be highlight of the track. We were going to get to the next hut earlier than we are used to stopping. Some of the options that we juggled were to continue on to the next hut and hoping there would be a spot for us, or just pushing through and finishing the whole thing.

Dennis standing in the fog on the Kepler Track.

As we discussed our options, we continued down the switchbacks. Every tenth of a kilometer, a numbered sign would count up, simultaneously informing us of how much we had left to go while also filling us with anxiety over how slowly the numbers were iterating.

Eventually, we hit the bottom and found ourselves at the Iris Burn Hut. It was another beautiful hut. We decided that before making any other decisions, we should go inside, eat some food and warm up.

Because of how wet we got while hiking, we decided to cook some hot lunch. It really hit the spot, but also made us sleepy. Before we knew it we had drifted off into slumber, leaving our plans of continuing on behind.

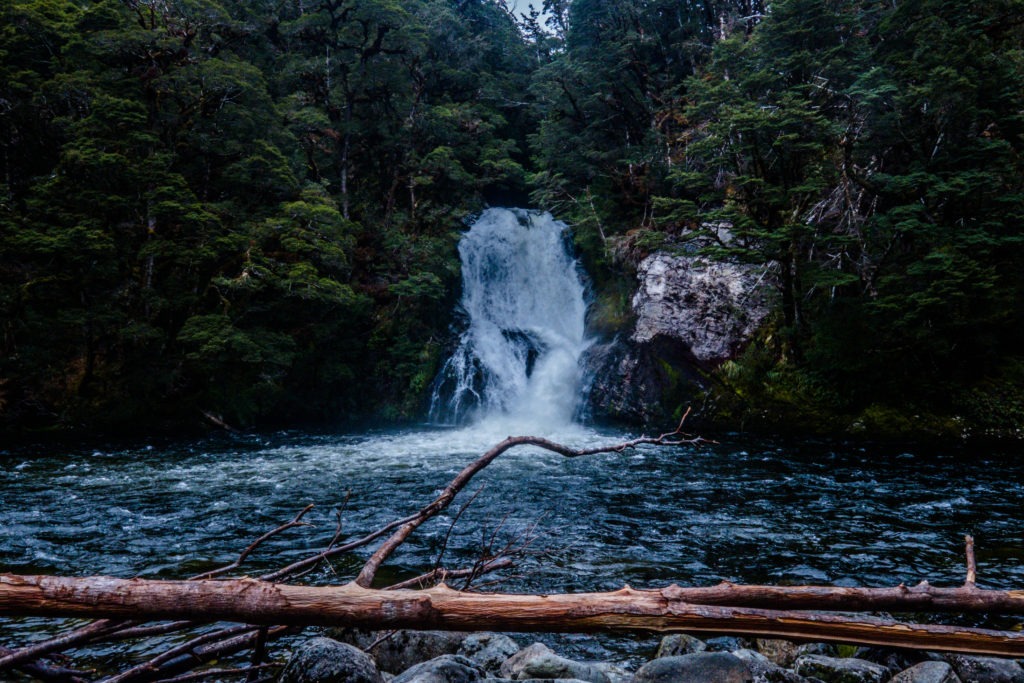
Side trip to Iris Burn Falls

We woke up feeling groggy, so we decided to make the side trip to the Iris Burn Falls to get some blood flowing. It was only a 20 minute walk, but absolutely worth the effort. The falls are quite spectacular, and because of the wet weather we were having, they were quite full.

There are a couple Kiwis who live in this section of the track and we were hoping to catch a sight or sound of one, but we were not so lucky. They are nocturnal animals so it’s quite rare in seeing them in the daytime.

We made our way back to the hut and started making dinner. While we were eating, the hut ranger arrived and gave her informational chat. She was significantly less verbose than previous hut rangers we had met, but she told us that the next day would be more of the same weather, so it wouldn’t be worth making a trip back up to try for the views.

The Iris Burn waterfall - one of the side trips on the Kepler Track.

After dinner, despite our earlier nap, we found ourselves ready to hit the hay. We hit the bunks and were out quickly.

Day 3

We weren’t in any rush, so we got a late start. After lazily rolling out of bed, we took our time enjoying our oatmeal before we hit the trail. We had decided earlier that we didn’t want to walk the last 10 kilometers between the two parking lots, so we had booked spots on the shuttle. Our only goal for the day was to get back to the first parking lot in time to catch our bus. It rained a lot overnight and we were not looking forward to walking through the wet and muddy trail.

Kepler Track Kilometers 28.5 – 37.4

Leaving the Iris Burn Hut, we immediately began ascending. It was not like the first day though, only a couple of switchbacks. The rain was not super heavy but it still dampened our moods. After several minutes, we were descending again. The first part of the day was through rainforest, as the first day had been. We got to enjoy walking amongst the fern again.

After just shy of an hour, we reached “the Big Slip”. A couple decades earlier, during heavy rain, a giant landslide occured down the side of the mountain. This left a huge mark on the earth at least the size of a football field. Even 20 years later, no trees have grown in this section of the trail, so it just appears as a meadow in the middle of the forest on the side of a mountain.

Walking through this section of the trail was very peaceful. It was a misty morning, and the meadow felt very calm. The silence was a bit eerie. Walking through the Big Slip, it was easy to let your mind wander to the “what ifs”; especially since it had been very rainy the previous few days.

The Kepler Track winding through the mountains in the fog.

Kepler Track Kilometers 37.5 – 44.6

We left the Big Slip and re-entered the rainforest. As beautiful as the rainforest was, it grew tiresome quickly, and the kilometers blur together in my memory. At the hut the previous night, I had read about the efforts to trap Stoats and other predators. Apparently the effort to lay traps every fifth of a kilometer had been very successful in preserving the native birds.

This trapping effort had one negative consequence, however. The traps were all numbered, so I began counting down until we reached the end. Even though they provides a means to measure our distance traveled, counting down the kilometers until the end of hike really made the whole section a drag.

We got to one of the numbered traps, and I realized that we should be getting close to the next hut on the trail. It had to be just around the corner. The next trap came and we still had not arrived. Before I knew it, a whole kilometer had passed and we were still walking. We reached the lakeshore, so I knew the hut had to be close. Yet, the trail continued weaving through the forest.

Dennis looking out over the Kepler Mountains

Finally, after what seemed like ages, the hut appeared almost out of nowhere. We had plenty of time to catch our bus, so we decided we would stop in this hut for lunch.

At the Moturau hut

When we got inside the hut, there was a fire blazing. It felt good. The weather had continued to be quite wet this day, so it was nice to warm up in the hut with some sandwiches. Luckily the rain completely died out by the time we got to the last hut.

There were a few other people in the hut when we got there. A couple of these people were familiar; some had been on the trail with us from day one, others we recognized at least from the night before, and a few faces were new.

Despite my best efforts not to eavesdrop, I couldn’t help but overhear two ladies a few tables over telling another hiker that they had left their car at the closest parking lot and were planning to hitchhike from the parking lot we started at back to their car. They were doing the Kepler Track in the opposite direction as us and this piqued my interest.

After building up a little bit of courage, I approached one of the ladies and made a proposal that could be mutually beneficial. If they would be willing to give me their car keys, I could go to the parking lot, pick up their car, drive it to the other parking lot and leave it there for them to find when they finished. This would give me an option to finish the track at my leisure, and their car would be waiting for them when they finished on a later day. We originally booked a car shuttle at 4PM to take us back to our parking lot but we were quite ahead of schedule so we decided that this would allow us to get back to Queenstown much earlier.

After some back and forth, we all came to an agreement. They handed me their car keys, we agreed on what the appropriate protocol for dropping the car would be, and then we went our separate ways.

Kepler Track Kilometers 44.7 – 50.6

The last few kilometers sped by. I was newly reinvigorated from the prospect of driving their car to bypass the last ten kilometers instead of waiting for the shuttle or walking all the way back. This part of the trail was also much more crowded since we were back in the realm of day-hikers.

Eventually, we passed a nice suspension bridge and arrived at the parking lot. A girl who had been in the hut with us the previous night was keeping about the same pace as us. She asked if we could give her a ride. We told her that we had never seen the car before. If there was room, she was more than welcome to join.

Finding the car was easy, it was a very particular shade of blue. Once we saw what we were dealing with, we told the girl she was welcome to join us. On the road, it was immediately clear that the car was in bad shape but at least in working order. Luckily it was only about a 15 minute drive to get back to our starting trailhead.

We arrived at our car, said our goodbyes and shoved the keys into the gas tank. Due to the weather, the Kepler Track had been a little bit of a disappointment for me, but it ended on a high note.

From my experiences with this hike, the Kepler Track is definitely doable in two days. My recommendation for those strapped for time would be to skip the first hut and continue all the way to the Iris Burn hut. It will be a long day but you will be rewarded with great views, provided that the weather is on your side! If you are not in a hurry the first hut has a magnificent location. It was definitely the nicest hut we stayed at in our time in New Zealand.

New Zealand Great Walks - the Kepler Track

Share:
Reading time: 15 min
Best Day•Travels

A Perfect Day at Laguna de Apoyo

January 30, 2018 by Elsbeth No Comments

Nicaragua is dotted with 19 active volcanoes, many of them still spewing molten earth. It was, however, one of the extinct volcanoes that drew me out of bed my first morning in the country. Of all the activities on my Nicaraguan itinerary, the one I absolutely knew I wanted to do was visit the Laguna de Apoyo. I had heard from many sources that it was the highlight of many travelers. I wanted the chance to swim in the sapphire waters myself while I was there.

After a quick breakfast and a SIM card debacle, we were ready to make our way out to the Reserve that contains the lake. Unfortunately, we missed the shuttle that transports people, so we had to opt for a taxi. The taxi cost $20. We were bummed to spend so much of our cash so early into the trip. If we had went with more people, the taxi would have been a good deal. The ride from Granada took about 20 minutes, half on highway and half on steep, unpaved road.

View of Laguna de Apoyo through the trees

At the recommendation of our hotel, we made our destination the Paradiso Hostel, but there are dozens of hotels along the lake and pretty much all of them offer some sort of day pass. The day pass at Paradiso Hostel costs $7 and includes use of all the grounds, the kayaks and complementary coffee all day! Upon check-in, I immediately made my way down to the beach, stripped to my bikini and jumped into the lake. It felt to refreshing.

I had heard that the water at Laguna de Apoyo was very warm.  It was comfortable to swim in, but it was not bath water the way I was expecting. After diving in, I immediately noticed that the water tasted sulphuric, which made sense. The lake is housed in a volcanic crater. Despite not being the temperature of bath water, the lake is still very comfortable considering how deep it is. The bottom of Laguna de Apoyo is the lowest spot in all of Central America. The water maintains its 25 degrees celsius with hot fumaroles. The beach next to Hostel Paradiso was comfortable to swim in, but there are some parts of the lake that are actually boiling!

The beach front at Paradiso Hostel

I spent a long time just floating out in the water. It was so serene to just tread while looking back at the shore.  Eventually, I noticed my fingers had long since pruned, so I headed back to the beach. Hostel Paradiso had a bar right on the beach. After drying off, I grabbed a seat and ordered some fries and a smoothie. The food was inexpensive and pretty tasty.  After finishing my meal and digesting a little, I spent some time wandering and shooting the grounds.

The Hostel Paradiso is, as the name suggests, a paradise. Hotels and resorts dot the shore of Laguna de Apoyo. But Hostel Paradiso’s location tucked in a small cove makes it feel remote. The hostel offers yoga, massage and Spanish lessons. There is a patio on the same level as the reception with an unbeatable view of the lake sprawling out below. This is where you can treat yourself to the hotel’s coffee. Honestly, if I had known how amazing and enjoyable my time at Hostel Paradiso was going to be, I think I would have stayed overnight. People treat Laguna de Apoyo as a day trip. I would, however, recommend all visitors spend a night.

Lightbulbs hang over the tables at the beach restaurant at Hostel Paradiso

Sweating from exploring the grounds in the hot Nicaraguan sun, I returned to the beach for my second dip in the lake. This swim was even more idyllic than the morning one.  As I made my way into the water, clouds had started rolling in. The beach was covered in shadow, but about 100 ft out in the lake, the sun’s rays were peeking through. Just floating in the mineral-rich water soaking in the last few drops of sunshine of the day was one of my highlights from all of Nicaragua.

When I finished my swim, clouds had completely shrouded the sky.  It was time to return to Granada. Hostel Paradiso offers a shuttle service to Granada, but the day we were visiting, the bus was broken, so Hostel Paradiso was organizing taxis for groups of four. While waiting for our taxi, the skies opened. The next thing I knew I was running through the rain for cover. While the weather is nobody’s fault, the hotel offered us our choice of free bottled beverages. We grabbed some waters and got in the cab back to Granada. It had been a perfect day.

Lounge area overlooking Laguna de Apoyo

Share:
Reading time: 3 min
Complete Guide•Travels

The Complete Guide to the Isla de Ometepe

January 24, 2018 by Elsbeth 1 Comment

When I was a little girl, I would spend hours looking at maps of the world.  I would trace roads and rivers and look for features that stuck out. There is a giant lake in the middle of Nicaragua that spurred my interest in the Central American country.  It was not so much the size of the lake that fascinated me; I grew up just blocks away from an even larger lake.  Instead, it was a uniquely shaped island within the lake that captured my attention for hours.  I have always had a desire to travel to Nicaragua, but more than that – I have always had a desire to travel to the Isla de Ometepe.

Background

Concepcion rising from Lago Cocibolca on Isla de Ometepe

The Isla de Ometepe is formed by two volcanos rising out of Lago Cocibolca – Concepcion and Maderas.  The word Ometepe comes from the Nahuatl words ome and tepetl which translates basically to two mountains. The two volcanos joined by an isthmus give the island its unique hourglass shape.

The island is home to approximately 40,000 people who primarily make their living from agriculture and tourism. An additional 60,000 people visit the island every year – most of whom come for eco-tourism. Spanish is the primary language of the island, but travelers with knowledge of English should have very little difficulty on the island.

How to get there

Dennis taking photos of Lago Cocibolca while standing next to the road

There is technically an airport on the island, but most likely you will arrive on the Isla de Ometepe by ferry. The ferry leaves from San Jorge about a dozen times every day and arrives at either Moyogalpa or San Jose. The vast majority of ferries arrive at Moyogalpa. The ride takes about an hour. Most of the boats are modern ferries, but a few are Lanchas. The Lanchas look a little scary but are perfectly safe – despite the fact that the crew locks the passengers below deck!

At the time of writing this, tickets for the ferries cost 55 cordobas and tickets for lanchas cost 35 córdobas (30 córdobas = 1 Dollar). Most guides and suggestions say that you will be fine buying your tickets just before the ferry leaves, and I think that generally this is true.  However, when we were buying tickets, we were told that everything except the last Lancha was sold-out. If you are planning to visit Isla de Ometepe in the busy season, consider pre-booking a ticket. You can check the schedule here!

Where to stay

 View of sunset behind a fence at Punta de Guavas

Moyogalpa

I did not stay in Moyogalpa or spend any time there.  It is the largest city on the island, but is pretty far from most of the things someone would want to do (with the exception of climbing Concepcion).  I think it is a good idea to get out of Moyogalpa as quickly as you can with a few exceptions: you are arriving on a late ferry and don’t want to travel to you destination so late, you are taking an early ferry and you want to be close to the ferry terminal the next morning, you are planning to climb concepcion the next day.  If none of these conditions apply, I would move on.

Santo Domingo

This was my original destination of choice on the island, however, by the time I got around to planning my trip, I was unable to find accommodations in this town. In hindsight, I have learned that it is possible to make last minute accommodations, YMMV. The reason to choose Santo Domingo is because of the proximity to the beach on the island.  There are multiple beaches, but certainly the best and widest one is Santo Domingo.  When I was visiting Isla de Ometepe, the beach was very small due to a particularly wet rainy season, so it would not have been worthwhile to stay the whole time in this part of the island anyway.  I spent almost a whole day exploring this part of the island, and it was lovely.

Balgue

Balgue is possibly the most touristy part of the island. Once you reach town, you immediately feel like you are in North America or Europe – especially when you see the prices.  The most expensive meal I ate in Nicaragua, I ate in Balgue. But, it is a popular spot on the island for a reason.  There are a plethora of places to eat and stylish restaurants or yoga spaces. Also, you are in close proximity to Finca de Magdalena – a farm that offers lodging and miles of trails to explore!

Merida

A view of Concepcion shrouded in the clouds from La Omaja

If Isla de Ometepe is an off-the-grid destination in an off-the-grid country, Merida is off-the-grid in a whole different league!  The paved road on the island ends at Santa Cruz (just past Santo Domingo), so to continue on to Merida requires about 45 minutes on a dirt-road (and to call it a dirt-road is generous).  Despite the difficulty in getting to Merida, I would say it is the best place to stay on the island, if only for the incredible sunsets!

La Omaja – If you are looking for a resort-type accommodation, this is absolutely the place to stay on the island. I did not stay here, but I went for sunset drinks and dinner. The view is unbelievable, especially during sunset. There is an infinity pool overlooking both the lake and Concepcion.  The staff were exceptional, friendly and accommodating. We went for dinner, on our last night on the island and it was truly spectacular! The dinner was not as inexpensive as most in Nicaragua, but it was ver tasty and less expensive than our meal in Balgue for more food. Taking into consideration that we were not charged a resort fee, it really became an excellent deal!  Even if you choose not to stay here, I would highly recommend stopping by for dinner.

Punta de Guavas – If you prefer renting a house to yourself, then this is the best choice on the Isla de Ometepe hands down. This is an AirBnb and not a hotel, but this is where I stayed on the island and I cannot recommend it enough! Cindi (the host) really goes out of her way to make sure her guests are happy. Cindi is very attentive; she will help organize any activity or give great recommendations.  She also leaves two bikes in the property for guests to use. The house is right on the lake and is large enough for groups. Of all the places to watch the sunset, the backyard of this house is probably the single best place on the island.

What to eat

The patio in front of palm trees at a Comedor on Isla de Ometepe

Nicaragua is not the country you go to if you are into gastronomic tourism, and Isla de Ometepe is no exception. With that said, there is some really tasty, fresh food on the island.  I already recommended La Omaja above, and I will add Restaurante Loana which is also in Merida.  Both of the meals I had at these two places were excellent.  As a bonus, they both accepted credit card.  For breakfast and lunch, I really enjoyed just popping into the Comedors and having smoothies. As I mentioned above, the most expensive meal I ate in Nicaragua was in Balgue.  The place was called El Bamboo.  The food and ambiance are really nice, but it was quite pricey!

What to do

A horse eating grass in front of Lago Cocibolca

The obvious thing to do on Isla de Ometepe is climb a volcano. There are two to choose from.  Concepcion is the active, pointy volcano.  It is an eight-to-ten hour climb, but if the weather is cooperating you have views all the way to the Caribbean. This was one activity I really wanted to do while on the island, however I had some pretty bad weather while I was there.  The other volcano is dormant Maderas.  The hike up Maderas is a six-to-eight hour hike through cloud forest.  At the top, there is a crater lake and it is typically shrouded with clouds.

If you are not interested in hiking one of the volcanos, there are other hikes you can do. One of the most popular choices is the trek to the San Ramon Waterfall (you can read my trip report here). I met some people while on the island that said the hike to San Ramon kicked their butts.  I didn’t think it was that challenging.

View of Maderas from the trail to the San Ramon Waterfall

If you don’t want to venture to the Maderas side of the island, you will find that the beach of Santo Domingo can keep you occupied entirely.  Nearby is the famous Ojo de Agua. I did not visit because I am not a huge fan of pools, but I have heard that people really enjoy it.

My favorite thing that I did while I was on the island was rent a scooter and just explore. Since I was staying in Merida, I had to learn quickly how to ride a scooter over terrible road, but once I got to Santa Cruz, it was smooth sailing. I was able to ride all the way from Altagracia to Balgue, stopping along the way to snap photos and take in the view.  Some of the stops I made were lunch at El Bamboo, a side trip to Finca de Magdalena and the Santo Domingo beach.  At one point it started pouring rain, so I quickly parked my scooter and hopped into a comedor where I enjoyed a beer while the storm passed.

My Recommendation

View of Concepcion at Sunset from La Omaja

My recommendation would be to spend three full days and four nights on the island.  Take the last lancha to the island. It will be an unforgettable experience – being locked in the bottom of an old boat watching Concepcion grow nearer as the sun sets.  Stay the first night in Moyogalpa.  Wake up early on day one to climb Concepcion.  After you finish your full day hike, transfer to stay in Merida and have dinner at Restaurant Loanna.

Wake up on day two and rent scooters to explore the island. Do not miss the Santo Domingo beach.  Additionally, I think the isthmus between Concepcion and Maderas is the most beautiful part of the island! Make sure you stop for plenty of photos! Not getting enough photos (my camera was not charged) is one of my major regrets.

On day 3, grab some bikes and head to the San Ramon Waterfall. Park your bikes at the entrance and walk ~4 kilometers to the falls.  On your way back, stop at Comedor Gloriana for a late lunch.  Head to La Omaja (if you are not staying there) for dinner and sunset! Wake up early on day 4 to catch a ferry back to the mainland 🙂

Elsbeth staring at the sunset over Lago Cocibolca at La Omaja on Isla de Ometepe

Share:
Reading time: 8 min
Page 1 of 3123»

Recent Comments

  • Dennis on The Kepler Track Trip Report
  • Stephanie Weeks on New Zealand Day 1
  • Dennis on The Complete Guide to the Isla de Ometepe
  • Travel With Trang on Big Island Day 3
  • Dennis on Big Island Day 3

Archives

  • July 2018
  • June 2018
  • February 2018
  • January 2018
  • December 2017
  • November 2017
  • October 2017

Categories

  • Best Day
  • Blog
  • Complete Guide
  • Diary
  • Lifestyle
  • Travels
  • Trip Report
  • Uncategorized

Recent Posts

Tongariro Alpine Crossing Trip Report

Tongariro Alpine Crossing Trip Report

July 17, 2018
The Kepler Track Trip Report

The Kepler Track Trip Report

June 24, 2018
The Routeburn Trip Report

The Routeburn Trip Report

June 15, 2018

New Zealand Day 8

February 21, 2018

New Zealand Day 6

Categories

  • Best Day
  • Blog
  • Complete Guide
  • Diary
  • Lifestyle
  • Travels
  • Trip Report
  • Uncategorized

Popular Posts

Trip Report: Trail of Ten Falls

Trip Report: Trail of Ten Falls

November 19, 2017
Trip Report: Cathedral Lake to Half Dome

Trip Report: Cathedral Lake to Half Dome

October 10, 2017

Big Island Day 3

January 16, 2018
Museum of Ice Cream vs Color Factory

Museum of Ice Cream vs Color Factory

December 10, 2017
Best Latte Art in San Francisco

Best Latte Art in San Francisco

November 4, 2017

Tags

Best Day coffee Laguna de Apoyo Nicaragua Oregon Portland San Francisco
Follow on Instagram

© 2017 copyright PREMIUMCODING // All rights reserved
Designed by Premiumcoding